Expand for images and click to enlarge
Billing
Because you’re receiving the ERC20 tokens back, CDP will meter all the token transfers, and bill you at the end of the month similar to the regular sponsored gas flow (based on the USD value of the ERC20 at the time your wallet receives). This gives you the flexibility to decide what to do with the tokens. The Paymaster's regular 7% service fee applies to this volume and is factored into the ERC20 quote your users receive and accept.
Note: existing Paymaster specific CDP credits continue to apply for regular sponsored Paymaster volume but not ERC20 Paymaster volume.
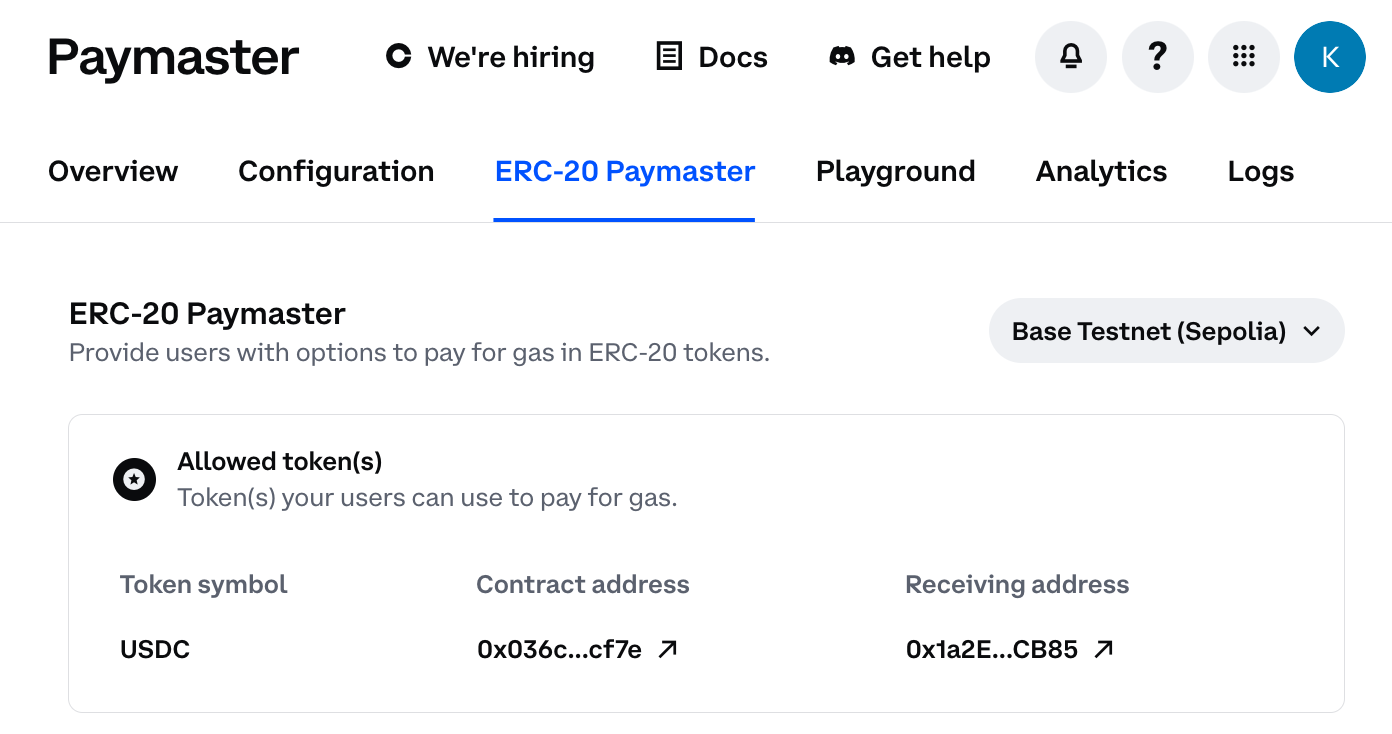
Configuring your policy
To allows your users to pay their gas in an ERC20 token, your policy needs to be configured to reject regular sponsorship.This allows you to configure customizations such as
- Fully sponsor 3 UserOperations per user per day - any additional UserOperations will require users to pay using ERC20 token
- Fully sponsor UserOperations up to $1 per week - any additional UserOperations will require users to pay using ERC20 token
- Never fully sponsor any UserOperations - all UserOperations will require users to pay using an ERC20 token
Per User Address Max to .01.
We also recommend creating a separate project to test your ERC20 custom flows so it doesn’t affect any existing regular sponsorship flows that you have.
Expand for images and click to enlarge
Integration guide & code examples
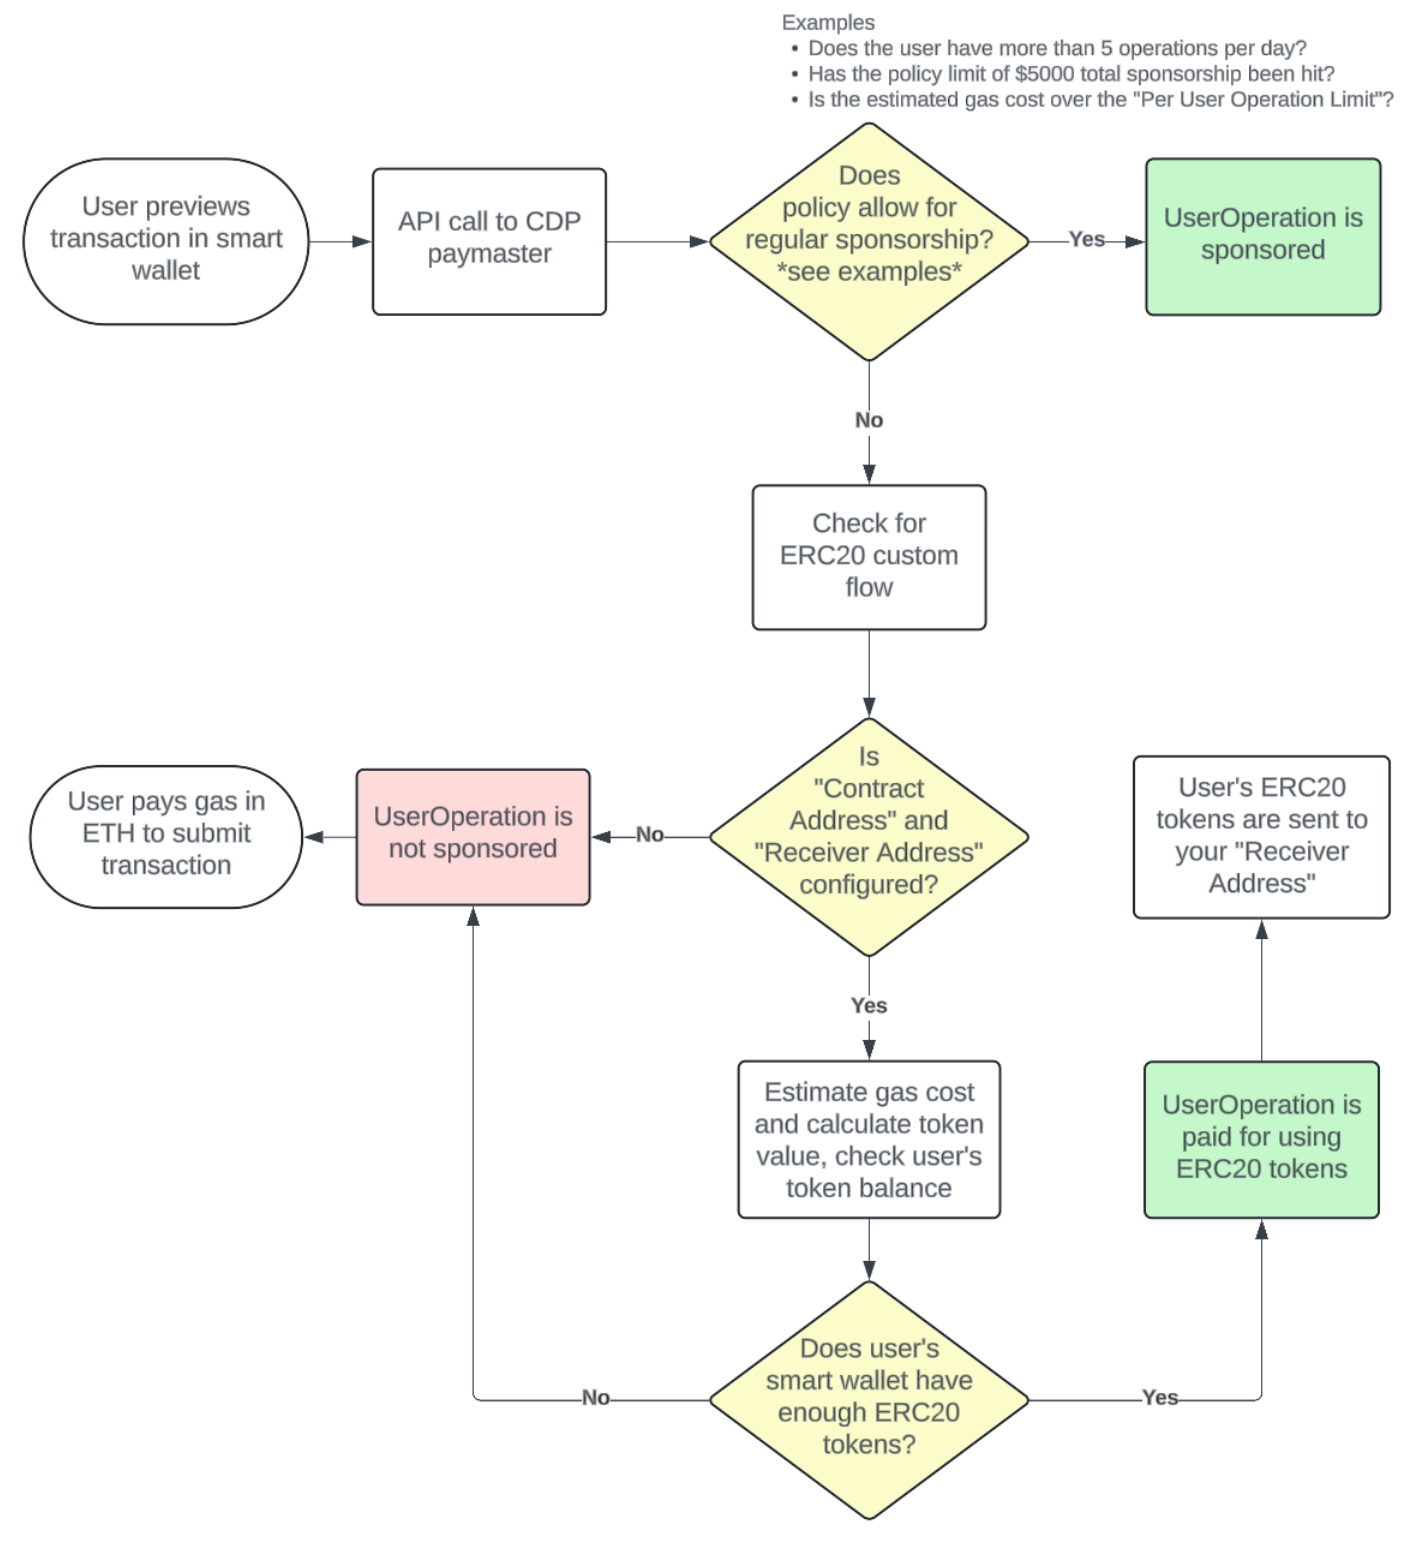
The ERC20 Paymaster fits seamlessly into any existing regular sponsored Paymaster integration. The only difference is that you need to configure your smart wallet to approve our Paymaster contract to spend your user’s ERC20 tokens.
- Paymaster Contract Address (Sepolia):
0x709a4bae3db73a8e717aefca13e88512f738b27f - Paymaster Contract Address (Mainnet):
0x2FAEB0760D4230Ef2aC21496Bb4F0b47D634FD4c
For example, the code below is almost identical to the index.js in the Paymaster quickstart guide. The only difference is that we added an approve function call to the calls field.
//index.js
import { http, encodeFunctionData, parseAbi } from "viem";
import { baseSepolia } from "viem/chains";
import { createBundlerClient } from "viem/account-abstraction";
import { account, client, RPC_URL } from "./config.js";
import { abi } from "./example-app-abi.js";
// Logs your deterministic public address generated by your private key
console.log(`Minting nft to ${account.address}`)
// The bundler is a special node that gets your UserOperation on chain
const bundlerClient = createBundlerClient({
account,
client,
transport: http(RPC_URL),
chain: baseSepolia,
});
// Approves our paymaster to spend your users erc20 tokens. The example below uses USDC
const tokenAddress = "0x036CbD53842c5426634e7929541eC2318f3dCF7e"
const tokenAmount = 1000000 // 1 USDC
const paymasterAddress = "0x709a4bae3db73a8e717aefca13e88512f738b27f"
const approve = {
to: tokenAddress,
data: encodeFunctionData({
abi: parseAbi(["function approve(address,uint)"]),
functionName: "approve",
args: [paymasterAddress, tokenAmount],
})
}
// The call for your app. You will have change this depending on your dapp's abi
const nftContractAddress = "0x66519FCAee1Ed65bc9e0aCc25cCD900668D3eD49"
const mintTo = {
abi: abi,
functionName: "mintTo",
to: nftContractAddress,
args: [account.address, 1],
};
const calls = [approve, mintTo]
// Pads the preVerificationGas (or any other gas limits you might want) to ensure your UserOperation lands onchain
account.userOperation = {
estimateGas: async (userOperation) => {
const estimate = await bundlerClient.estimateUserOperationGas(userOperation);
// adjust preVerification upward
estimate.preVerificationGas = estimate.preVerificationGas * 2n;
return estimate;
},
};
// Sign and send the UserOperation
try {
const userOpHash = await bundlerClient.sendUserOperation({
account,
calls,
paymaster: true
});
const receipt = await bundlerClient.waitForUserOperationReceipt({
hash: userOpHash,
});
console.log("✅ Transaction successfully sponsored!");
console.log(`⛽ View sponsored UserOperation on blockscout: https://base-sepolia.blockscout.com/op/${receipt.userOpHash}`);
console.log(`🔍 View NFT mint on basescan: https://sepolia.basescan.org/address/${account.address}`);
process.exit()
} catch (error) {
console.log("Error sending transaction: ", error);
process.exit(1)
}Please consider checking for your user's ERC20 allowance before adding the additional ERC20 approve function call. This will save on gas costs for your users as our Paymaster is already allowed to spend their funds.
// Checks for allowance
const allowance = await client.readContract({
abi: parseAbi(["function allowance(address owner, address spender) returns (uint256)"]),
address: tokenAddress,
functionName: "allowance",
args: [account.address, paymasterAddress],
})
const calls = [mintTo]
if (allowance < tokenAmount) {
calls.unshift(approve)
}Specification
The CDP ERC20 Paymaster uses both pm_getPaymasterStubData and pm_getPaymasterData JSON-RPC requests specified by ERC-7677 and an additional API pm_getAcceptedPaymentTokens. We step through each request and response below.
pm_getPaymasterStubData and pm_getPaymasterData
- The paymaster will use the specified ERC20 for payment if specified in the 7677 context field under
erc20. - Upon rejection / failure the paymaster should return a
datafield in the JSONRPC response which could be used to approve the paymaster and includes:
acceptedTokensarray which is a struct including the token addresspaymasterAddressfield which is the paymaster address which will perform the token transfers.
- Upon success the paymaster will return a
tokenPaymentfield in the result. This includes:
tokenAddressaddress of the token used for paymentmaxFeethe maximum fee to show in the UIdecimalsdecimals to use in the UInamename of the token
Smart wallet will simulate the transaction to ensure success and accurate information.
Request
This is a standard V0.6 Entrypoint request example with the additional context for the specified token to be used.
{
"jsonrpc": "2.0",
"id": 1,
"method": "pm_getPaymasterData",
"params": [
{
"sender": "0xe62B4aD6A7c079F47D77a9b939D5DC67A0dcdC2B",
"nonce": "0x4e",
"initCode": "0x",
"callData": "0xb61d27f60000000000000000000000007746371e8df1d7099a84c20ed72e3335fb016b23000000000000000000000000000000000000000000000000000000000000000000000000000000000000000000000000000000000000000000000000000000600000000000000000000000000000000000000000000000000000000000000000",
"callGasLimit": "0x113e10",
"verificationGasLimit": "0x113e10",
"preVerificationGas": "0x113e10",
"maxFeePerGas": "0x113e10",
"maxPriorityFeePerGas": "0x113e10",
"paymasterAndData": "0x",
"signature": "0x5ee079a5dec73fe39c1ce323955fb1158fc1b9a6b2ddbec104cd5cfec740fa5531584f098b0ca95331b6e316bd76091e3ab75a7bc17c12488664d27caf19197e1c"
},
"0x5FF137D4b0FDCD49DcA30c7CF57E578a026d2789",
"0x2105",
{
"erc20": "0x833589fcd6edb6e08f4c7c32d4f71b54bda02913"
}
]
}Response
Successful response:
{
"id": 1,
"jsonrpc": "2.0",
"result": {
"paymasterAndData": "0x2faeb0760d4230ef2ac21496bb4f0b47d634fd4c0000670fdc98000000000000494b3b6e1d074fbca920212019837860000100833589fcd6edb6e08f4c7c32d4f71b54bda029137746371e8df1d7099a84c20ed72e3335fb016b23000000000000000000000000000000000000000000000000000000009b75458400000000697841102cd520d4e0171a58dadc3e6086111a49a90826cb0ad25579f25f1652081f68c17d8652387a33bf8880dc44ecf95be4213e786566d755baa6299f477b0bb21c",
"tokenPayment": {
"name": "USDC",
"address": "0x833589fCD6eDb6E08f4c7C32D4f71b54bdA02913",
"maxFee": "0xa7c8",
"decimals": 6
}
}
}Rejection response:
{
"id": 1,
"jsonrpc": "2.0",
"error": {
"code": -32002,
"message": "request denied - no sponsorship and address can not pay with accepted token",
"data": {
"acceptedTokens": [
{
"name": "USDC",
"address": "0x833589fCD6eDb6E08f4c7C32D4f71b54bdA02913"
}
]
}
}
}pm_getAcceptedPaymentTokens
pm_getAcceptedPaymentTokens returns an array of tokens the paymaster will accept for payment.
The request contains the entrypoint and the chain id with optional context.
Request
{
"jsonrpc": "2.0",
"id": 1,
"method": "pm_getAcceptedPaymentTokens",
"params": ["0x5FF137D4b0FDCD49DcA30c7CF57E578a026d2789", "0x2105", {}]
}Response
{
"id": 1,
"jsonrpc": "2.0",
"result": {
"acceptedTokens": [
{
"name": "USDC",
"address": "0x833589fcd6edb6e08f4c7c32d4f71b54bda02913"
}
]
}
}Troubleshooting
request denied - max address sponsorship value reached 0x4D44afB8D98c9984F381E60Ac855D89C73f40e45 and sender can not pay with an accepted ERC20”
The first part of the error signifies why the regular fully sponsored transaction was not accepted. This is to be expected. However, if the “sender can not pay with an accepted ERC20”, check to make sure that the user has enough ERC20 tokens in their wallet to pay for the gas and your wallet approved our Paymaster to spend those tokens.