Why agents?
Messaging is the largest use-case in the world, but it’s more than just conversations—it’s a secure, programmable channel for financial and social innovation. When combined with the onchain capabilities of Base App, builders have a new surface area to build 10X better messaging experiences not currently possible on legacy platforms like WhatsApp or Messenger. Real Examples:- Smart Payment Assistant: Text “split dinner $200 4 ways” and everyone gets paid instantly with sub-cent fees, no app switching or Venmo delays.
- AI Trading Companion: Message “buy 100 dollars of ETH when it hits $3,000” and your agent executes trades 24/7 while you sleep.
- Travel Planning Agent: “Book flight LAX to NYC under $300” and get instant booking with crypto payments, all in your group chat.
Getting started
Build powerful chat agents that integrate seamlessly with Base App using the XMTP messaging protocol.For more detailed information, visit XMTP documentation
Installation
Usage
This example shows how to create an agent that sends a message when it receives a text message.agent.ts
Set environment variables
To run an example XMTP agent, you must create a.env file with the following variables:
.env
Get a basename for your agent
Give your agent a human-readable name: 1. Import agent wallet to Base App extension:- Install Base App browser extension
- Import using your agent’s private key
- Visit https://base.org/names
- Connect your agent’s wallet
- Search and purchase your desired basename (e.g., myagent.base.eth)
- Set as primary name
- Your agent can now be reached via the basename instead of the long address
- Users can message myagent.base.eth instead of 0x123…
Quick actions
While Base App supports all standard XMTP content types for rich messaging capabilities, this section focuses specifically on Base-developed content types that enhance agent interactions within Base App. These Base-specific content types (Quick Actions and Intent) provide unique functionality that may not be supported by other XMTP clients. For standard XMTP content types like reactions, attachments, and transactions, see the XMTP documentation.Base App content types
There are content types developed by the Base App team for agents in Base App. Other XMTP clients may not support these content types. Quick Actions (coinbase.com/actions:1.0) Purpose: Present interactive buttons in a message Structure:ActionsContent
id,descriptionare requiredactionsmust be 1–10 items with unique IDs- Style must be one of:
primary,secondary,danger
Fallback format
Payment options
IntentContent
id,actionIdrequired- Must match corresponding Actions
metadatais optional,<10KB
Fallback format
Intent message

Transaction trays
If you would like to display agent information such as favicon and branded title, utilize the metadata property of wallet send calls data. Example: Display agent informationWallet send calls data
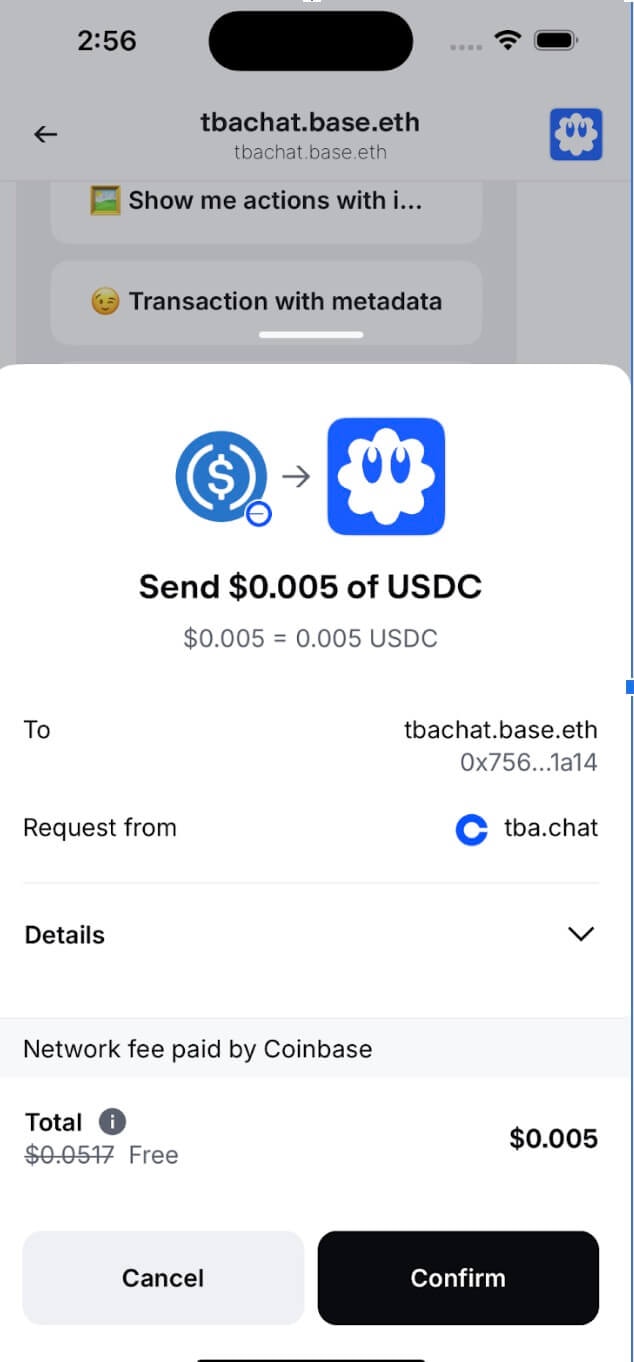
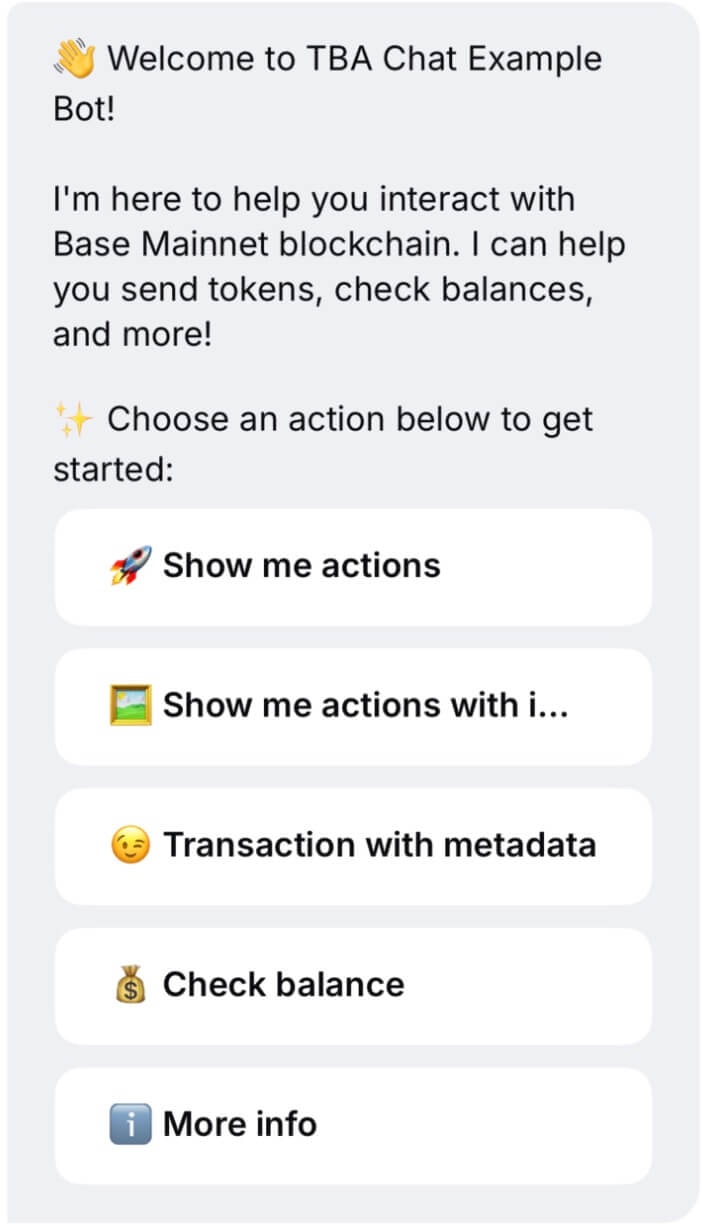
TBA Chat Example Bothttps://github.com/siwan-cb/tba-chat-example-bot
Deeplinks
Deeplinks enable seamless navigation within Base App, allowing agents to create more engaging and intuitive user experiences. The most common use case is directing users to start a private conversation with an agent from a group chat context.Direct message deeplinks
Use case
Your miniapp has an agent and you want to encourage people to chat with the agent directly. Or, your agent exists in a group chat context and wants users to interact with it privately. You could add a button like “Chat with me” and use this deeplink.Syntax
Deeplink syntax
Parameters
- address — The 0x address of the user you want to chat with (in hex format, e.g.,
0xabc...1234)
Implementation examples
Basic Button Implementation:Basic button
DeeplinkButton.tsx
Payment agents (x402)
x402 is an open payment protocol developed by Coinbase that enables instant, automatic stablecoin payments directly over HTTP. It empowers AI agents to autonomously pay for services without subscriptions or API keys.Key benefits
- Autonomous economic transactions - Agents can transact without human intervention
- Pay-as-you-go monetization - Only pay for the services you actually use
- Minimal setup - Often requires just one middleware line
- Instant settlement - Payments are verified on-chain in real-time
Basic integration
Here’s how your agent handles payment-gated requests:x402-agent.ts
UX considerations
- Clear pricing - Display exact costs upfront
- Payment confirmation - Confirm successful payments
- Graceful failures - Handle payment errors elegantly
- Value communication - Explain what users get for their payment
Mini app integration
Mini Apps can live inside conversations, letting friends play, trade, plan, and coordinate together without ever leaving the chat. This means that you can have virality spread through natural conversation (“try this right here”) along with sharing in larger settings. When combined with intelligent agents, you create powerful experiences that spread through natural conversation. This integration unlocks unique distribution and engagement patterns:- Natural virality: “Try this right here” moments spread organically through conversation
- Contextual engagement: Agents can introduce Mini Apps at the perfect moment
- Group coordination: Agents orchestrate multiplayer experiences and keep everyone engaged
- Persistent presence: Agents maintain engagement between Mini App sessions
- Group Gaming: Agent coordinates a multiplayer quiz, announces winners, and keeps score across sessions
- Event Planning: Agent shares planning Mini App when someone mentions meeting up, handles RSVPs and updates
- Trading Competitions: Agent creates trading challenges, shares leaderboards, and celebrates wins
- Social Polls: Agent launches polls when decisions need to be made, tallies results, and announces outcomes
Share Mini Apps in App
Every Mini App has a shareable URL that agents can send directly in chat. When dropped into a conversation, the link automatically unfurls into a rich preview card that others can tap to launch instantly. Share Flow:- Agent triggers share — Based on conversation context or user request
- Link generates preview — Platform fetches Mini App metadata and creates rich embed
- Users engage — Tap preview to launch Mini App directly in conversation
- Agent coordinates — Continues engagement, shares updates, mentions participants
Basic sharing
Context-aware sharing
User engagement and mentions
Agents on XMTP only have access to the 0x addresses. If you’re building a group chat experience with Mini Apps, you’ll want to use human-readable mentions like display names (like @jesse) for a more social, intuitive experience. This API from Neynar will give your agent access to this data: Getting Display Names:neynar.ts
Agent spotlight: Squabble
Squabble uses Mini Apps in a social, fun way, with the agent coordinating the multiplayer experience. The agent sends a Mini App to the group, and broadcasts to the group updates as people join and compete in the game. They mention the usernames of the people who have joined the game and won the game. The game happens inside the Mini App, which provides a more interactive, visual experience. Key Features:- Rich mentions — Agent uses display names (@username) instead of wallet addresses
- Real-time updates — Broadcasts join notifications and game progress to maintain group engagement
- Social celebration — Announces winners and achievements to drive continued participation
- Contextual triggers — Responds to gaming-related conversation with relevant Mini App shares
Best practices for agent behavior
Timing and Context
Timing and Context
- Smart triggers — Share Mini Apps when conversation context suggests engagement opportunity
- Avoid spam — Don’t share the same Mini App repeatedly in short timeframes
- Read the room — Gauge group interest before introducing games or activities
- Natural integration — Make Mini App shares feel like helpful suggestions, not advertisements
Group vs. Direct Messages
Group vs. Direct Messages
- Direct messages — Automatically share relevant Mini Apps based on user requests
- Group messages — Only share Mini Apps when mentioned (@agentname) or when replying to agent messages
- React to acknowledge — Use emoji reactions (👀, ⌛) to show message received while processing
- Coordinate experience — In groups, act as facilitator for multiplayer Mini App experiences
User Experience
User Experience
- Use display names — Always resolve addresses to human-readable names for mentions
- Celebrate achievements — Announce wins, completions, and milestones to drive engagement
- Maintain context — Remember ongoing games/activities and provide relevant updates
- Enable discovery — Suggest related Mini Apps based on user interests and behavior
Best practices
As you start building, review these guidelines to understand what makes an agent successful in the Base app. We recommend trying out existing agents in the app first to get a feel for the quality bar, what works well, and areas for improvement.Build a high quality foundation
Your agent should provide a seamless, professional experience that users will want to engage with repeatedly. Here are the core requirements:Responding to messages
Multi-Channel Support- Respond to both DMs and group chats appropriately
- Maintain consistent functionality across different conversation types
- React to messages with a simple reaction (👀, 👍, ⌛, etc.) to show acknowledgment
- This gives users confidence their message was received while processing
- Provide responses quickly (< 5 seconds)
- Users expect near-instant communication in messaging apps
Group chat etiquette
In group chats, agents should only respond when:- Mentioned directly with ”@” + agent name (e.g., @bankr)
- Replied to directly when a user replies to the agent’s message using the reply content type
Communication style
Sound Human- Use conversational, fun, and clear language
- Keep responses polished but not robotic
- Match the energy and tone of the conversation
- Only ask for personal information when absolutely necessary
- Always explain why the information is needed
- Respect user privacy and data minimization principles
Craft compelling onboarding
Your agent’s first impression is critical. The onboarding message should immediately communicate value and give users a clear path forward.Great onboarding message structure
- Introduce the agent - Quick, friendly greeting with the agent’s name
- Explain capabilities - Clear, specific examples of what it can do
- Use quick select buttons - Make it easy for users to select an action to take with the agent
Good onboarding
- Friendly, conversational tone
- Specific feature examples with concrete commands
- Clear value propositions
- Ends with a direct call-to-action
Bad onboarding
- Generic greeting with no context
- No explanation of capabilities
- Puts burden on user to figure out what to do
- No clear value proposition
Showcase unique value
Solve real problems
Your agent should:- Address a unique pain point or bring a delightful twist to an existing space
- Help users accomplish tasks more easily than existing solutions
- Provide clear benefits that users can understand immediately
Enable user success
Focus on helping users:- Earn - Generate income, rewards, or value
- Connect - Build relationships or communities
- Have fun - Provide entertainment or engaging experiences
- Complete tasks - Streamline workflows or processes
Design for engagement
Build Natural Growth Loops- Include features that encourage sharing, re-engagement, and habit forming
- Make it beneficial for users to invite others
- Create ongoing value that brings users back
- Define the ideal user experience first
- Craft agent messages around that journey
- Guide users through progressive value discovery
Continuous engagement strategy
As users complete actions with your agent:- Show clear next steps - Always give users something else to try
- Highlight ongoing value - Explain how continued use benefits them
- Create habit loops - Design features that encourage regular interaction
- Prevent one-and-done usage - Build features that require return visits
Examples of engagement features
- Progressive features - Unlock new capabilities as users engage more
- Personalization - Learn user preferences and customize experiences
- Social elements - Enable sharing achievements or inviting friends
- Recurring value - Automated tasks, alerts, or regular check-ins
- Gamification - Points, levels, or achievement systems
Resources
XMTP Documentation
Complete XMTP protocol documentation for messaging integration
x402 Protocol Docs
Complete x402 protocol specification and implementation guide
Example Agent Repo
Reference implementation for Base App chat agents
Squabble Example
Multiplayer game agent with Mini App integration